Radio Buttons Tutorial
So far, you've learned how to ask the user to enter information using INPUT FIELDS. But what if you only want to know a simple yes or no answer? Instead of typing Y or N or any other option, you can simply provide a radio button or checkbox instead.
Enter the following code:
10 LET Y$=”Yes”: let N$=”No”
15  RINPUT FIELDS “2,5,radio 4,2,8;3,5,radio 3,2,9”:Y$,N$
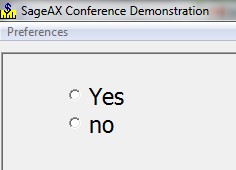
and run it. You have a set of radio buttons!
Next edit line 10 to include a carrot (^) before Yes:
10 LET Y$=”^Yes”: let N$=”No”
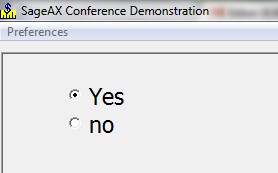
When you run it this time, you should notice a small change.
This time, “Yes” is auto-selected. (Thanks to the carrot symbol!)
It will still let you change it to “No,” of course.
Next, add the following two lines:
20 IF Y$(1:1)=”^” THEN print y$, else print n$
25 print FKEY
Then run the program, and make a selection.
The carrot also identifies which radio button was selected. Keep this notation in mind when writing user selections to a file. But what is the FKEY? It should be 8 or 9, depending on whether “Yes” or “No” was selected. Let's take a closer look at the syntax of our example:
RINPUT FIELDS “2,5,radio 4,2,8;3,5,radio 3,2,9”:Y$,N$
RINPUT FIELDS means that the program prints the radio button and a label and then waits for an input or change. Using INPUT FIELDS will simply display the radio buttons without their captions. Using PRINT FIELDS will only print the button and label but not wait for input, which is useful for displaying pre-recorded results. Typically, a program would require RINPUT for data entry and PRINT for reporting. INPUT FIELDS is useful if the caption is printed by another program line, and allows the button to appear to the right of the words.
Continuing with the above syntax, 2 and 5 denote the rows and columns where the radio button will appear, RADIO makes it a radio button. The number immediately following RADIO says how many columns the caption will be (allow an extra column for the carrot). Then comes the group number (here we have group 2) and last the FKEY value assigned when its selected.
It's important to remember that radio buttons are grouped, which means that selecting one will deselect the others in the group, so only one FKEY value will be valid at a time. To select multiple values in a group, either make each button its own group, or use check boxes.
Let's review the syntax once more with all possible parameters:
INPUT/RINPUT/PRINT FIELDS row, col, RADIO cols, group attribute, FKEY, NOWAIT: “^caption”
“Row” and “col” tell BR where on the screen to begin the radio button label and “cols” says how many columns wide the caption will be.
“Group” refers to which group the button will be in (assuming you want more than one to select) and “attribute” is any attribute you'd like to add.
The FKEY is specified, an FKEY interrupt is generated when the item is clicked ON or OFF.
NOWAIT denotes the G attribute, which returns control immediately to the program.
The optional carrot (^) at the beginning of the caption indicates a preselected setting but is not displayed. The caption must be placed in a variable for either INPUT or RINPUT FIELDS statements, as in the example used for this section. The parameters are repeated after a semi-colon for multiple radio buttons in a group.
Exercise 1.1
We are going to create a short program that records order information for a company. Write the portion of the code that asks the user about whether they want overnight or regular shipping. It should look something like this, but feel free to customize it a little. Save it under the name Chapter1.br:
Reminder: The use of FKEY saves a certain value in FKEY, so that the user's selection can be recorded to a file.
If you need help, a sample program is available on the solutions page.
Next: Checkboxes
Table of Contents


